Modo
OSX render clients
We recommend that you install modo into a folder with the version in its name. E.g. /Applications/modo10.
Otherwise you have to specify the version in the render app configuration of the client.
Submission
Installation:
You have to run the rrWorkstationInstaller at least once to install the RR_ROOT environment variable. (Check at least "submitter plugins" and install.)
It can be that you have to restart the machine for the environment to take effect.
Submission steps:
|
1) Scene Settings: Note: The first time you set the output filename, you have to use the "Browse..." button. As you can only set the file extension via the browse button. And without a file extension, Modo will not render the Layer. |
|
|
2) Start rrSubmitter: |
|

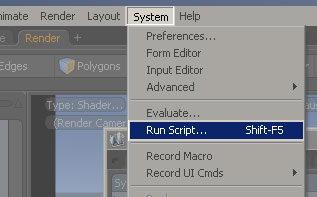
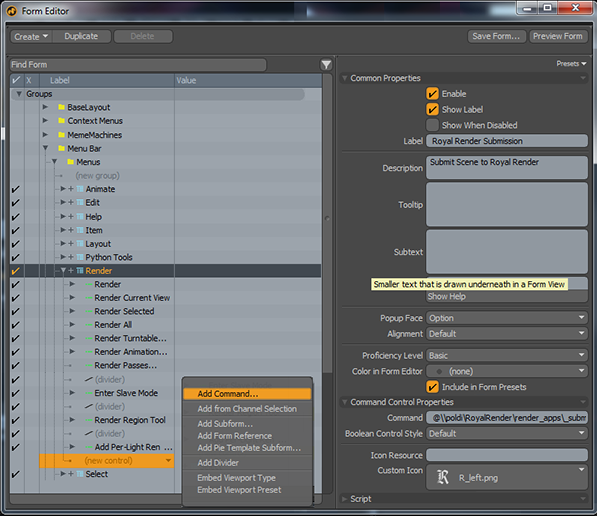
Add Submission to Modo menu
You can add the submission script to your menu "Render":
|
|
Custom Configuration
If you want to use a custom Modo config file, then please place the config into the folder
[RR]\render_apps\renderer_prefs\modo\win_x64\10.0\
You have to replace the win, the x64 and the 4.01 with the version you use.
If you do not know the right values, please render a modo job.
Then open the render log and take a look at the render commandline.
Render all layers at once
If you want to render all layers at once, you have two options:
- Separate mode:
Setup the image output for each layer separately like described above. - Joined mode:
Setup the image output for each layer separately like described above.
But instead of entering a different name, enter the same filename.
The joined mode has the advantage that RR can use the Local Render Out feature.
If you want to render each layer into its own subfolder, see next help section.
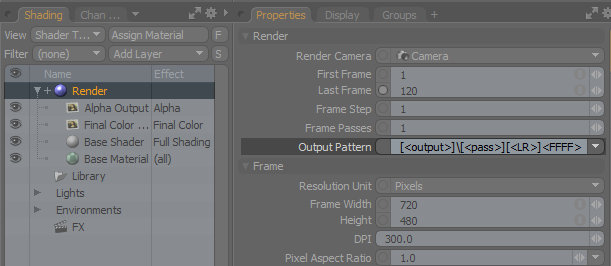
Output Pattern - Output Layer Subfolder
|
Modo does not support subfolders inside the Output Pattern of your render settings. But with RR, you can use the output layer name as folder name. The output pattern: \[<output>]\[<output>]_[<pass>]_[<LR>]<FFFF>.ext. Note: You can NOT use the pass or any other variable as folder name. Only the output layer (<output>) can be used. Example: Your layer name is "FinalColor". You want to render into \\fileserver\ share\ myModo\ renderout\ FinalColor\ FinalColor.###.exr Set the output pattern to \[<output>]\[<output>]_[<pass>]_[<LR>]<FFFF>.ext Use the browse button for the Layers Output Filename to set the file format .exr. Set any filename in the browser like \\fileserver\ share\ myModo\ renderout\ temp.exr Close the file browser and change the output to \\fileserver\ share\ myModo\ renderout\ If you now combine the output pattern with your output filename you get: \\fileserver\ share\ myModo\ renderout\ [<output>]\ [<output>]_[<pass>]_[<LR>]<FFFF>.ext. Note: Unfortunately you cannot edit or copy-paste the Output Filename of a Layer IF you have never used the browse button before. The browse button is the only way to set the file format. If you have set the file format once, you can edit or copy-paste the path. |
|
Layered Exr
IMPORTANT:
Modo 801 crashes if you try to render Layered images.
You can not use it.
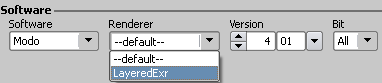
To render layered exr, you have to switch the renderer at the submitter to "LayeredExr".
Note: You have to use .exr as file extension for all Layers.
Multiple Cameras
The submission plugin will read all cameras.
You can the same scene with multiple cameras.
But you have to use <Camera> in the modo output pattern, otherwise all jobs render the same output name.
Note: <Camera> is not supported by Modo, it is supported by RR only.
Relative Image Paths
If you are using images which are relative to the scene file name, then you have to disable "Local Scene Copy".
Otherwise no image will be rendered.
