Scripted
Installation
- If you have not changed your users houdini.env to add some plugins, then it is sufficient to install the Submission Plugins via rrWorkstationInstaller.
- Otherwise you have to edit your users houdini.env file.
In case you already have some modifications for HOUDINI_PATH, then add this line to the end of the file:
HOUDINI_PATH = $RR_ROOT\render_apps\_submitplugins\Houdini;$HOUDINI_PATH
In case there is no line that changes HOUDINI_PATH, then add this line to the file:
HOUDINI_PATH = $RR_ROOT\render_apps\_submitplugins\Houdini;&
Submission
HtoRR offers different ways to submit jobs to Royal Render.
To submit a job to Royal Render you can
- Menu Render -> Submit to Royal Render
If you have selected nodes, then these selected nodes and their incoming nodes will be parsed and submitted.
If no nodes are selected, all available ROP networks will be submitted - Right-click on a node and select "Submit to Royal Render".
- Add a rrSubmitter node to your /our or /stage graph and connect it to the ROP/LOP
Note: As LOPs do not have output connections, you have to add the LOP path to the rrSubmitters parameter "Output Driver".
Hint:
To disable a node from being parsed, the user can set this node to bypass.
Incoming nodes will still be parsed, but without adding further functionality.
Special node type support
RR supports special nodes as well:
- Merge
- Switch
- Wedge
- Fetch
Unsupported nodes
The Submitter might not support all nodes.
In this case you can use a workaround:
Create a Fetch and a Mantra ROP in /out.
Fetch the unsupported node you want to process.
Connect Fetch into Mantra.
Set Mantra to some small resolution like 100x50.
Submit the Mantra node.
So far these nodes are supported in RR 9.1.23:
- Alembic
- Geometry
- Filecache
- Comp
- Copernicus
- USD
- USDrender
- USDstitch
- Arnold
- Mantra
- Octane
- OpenGL
- Redshift
- Renderman
- Karma
- VRay
Ignore Nodes for submission
There are a two ways to tell the plugin not to submit a ROP/LOP:
- The ROP itself or any of the parent nodes should be set to "bypass" in Houdini.
- Add a spare parameter of type "Toggle" to the ROP/LOP and name it "rr_disabled".
New Royal Render Nodes
The Houdini to Royal Render plugin comes also with additional node types:
- rrSubmitter
- rrDependency
- rrGenericJob
- rrPython
- rrDenoise
rrSubmitter ROP/LOP
The RR Submitter node enables you to set basic Royal Render settings for jobs which eventually will be generated upstream.
It also comes with the functionality to send the submission generated by the incoming nodes directly to the farm without opening the Royal Render Submitter window.
The plugin is designed to handle large and complex ROP networks to facilitate different kinds of production needs.
It is therefore possible to use and combine multiple rrSubmitter nodes.
If you override a setting in a rrSubmitter node, then this override is applied to the parent input ROPs only.
Please see the end of this help page for examples.
Spare parameter instead:
If you do not want to use the rrSubmitter ROP node,
then you can add spare parameter to your ROP/LOP for job overrides.
How to add spare parameter in Houdini:
https://www.sidefx.com/docs/houdini/network/spare.html#how-to
Supported spare parameter names are:
- rr_jobsettings
- rr_job_variables
- rr_env_variables
Please see next section for an explanation of "Job Settings", "Job Variables" and "Env Variables"
UI layout
Main Settings
|
Archive Mode |
If you submit a ROP that has activated an archive export (.usd / .ifd.sc / .ass.gz / .rs /.rib ), then you can choose which job RR should submit. |
||||||||||
|
Fetch Output Driver |
Instead if using an input connection, you can specify the ROP/LOP to be parsed. |
||||||||||
|
Automatically Save Hip Files |
Save the hip file before submission. |
||||||||||
|
Cook tree |
Executes a cook on the scene. (e.g. in case you have set your Houdini tree to cook manually) |
||||||||||
|
Pre Submit Python Cmd |
A python expression(command) that will be executed before the rrSubmitter ROP adds its jobs to the submission.
any_variable = ( MyPreExpression )
any_variable = printf("Hello") Workaround Expression <> Statement There is a workaround by using exec(), but note that exec() cannot return any value.
Note that you can use ; or \n within python to create a new code line. |
Job Settings
Most override have a checkbox to enable the override for that setting.
If you enable the override, it is set for all incoming nodes.
|
Scene Display Name |
Change the scene name display in rrControl |
||||||
|
RR Renderer Name |
Overrride the renderer name that should be used for the rrJob. Only required if you have created custom render configs, e.g. if you have enabled RRs REZ support in these ones. Note that you can use it to add a prefix or suffix to the renderer name as well. Like *_rez |
||||||
|
Assign To |
Override clients or client groups to submit the job to. |
||||||
|
Priority |
Override rrJob setting "Priority". |
||||||
|
Distribution Mode |
|
||||||
|
Sequence Divide |
Override rrJob setting "Sequence Divide" |
||||||
|
Sequence Divide Comp |
This overrides the Sequence Divide for Compositing jobs (Note: Denoise has the type "comp" in RR as well) |
||||||
|
Memory |
Override rrJob setting "Required Memory" |
||||||
|
Local Scene Copy |
Override rrJob setting "Local Scene Copy" |
||||||
|
Little job |
Override rrJob setting "Little Job" |
||||||
|
Delete output on submission |
The rrSubmitter automatically deletes frames that had been rendered before. |
||||||
|
Ignore ROP Inputs |
Each ROP is send to the farm "without input connections". This means that the input of a ROP will not be evaluated. |
||||||
|
Job Settings |
A list of all rrSubmitter options. The format is the same as within the rrSubmitter default files. e.g. RenderPreviewFirst=1~0; SendDisabled=1~1 |
||||||
|
Job Variables |
A list of Custom Job Variables. The format is MyVar=Value; AnotherVar=OtherValue |
||||||
|
Env Variables |
A list of additional environment variables. The format is MyVar=Value; AnotherVar=OtherValue Note: If you want to add other scene variables, add them like this: Note: You can modify our example on-Submission script in the rrSubmitter as well to add env vars. The python script can automatically include env var XY for render app Houdini. |
Scene Overrides
|
Camera |
Override the camera for rendering |
|
Frames |
Override the frame range |
|
Resolution |
Override the frame resolution |
|
Take |
Limit the take to be rendered |
rrDependency
The rrDependency node creates dependencies between jobs, where a job is waiting to be started until a target job is finished.
The order of the incoming nodes controls the dependencies between jobs.
For example, all jobs generated by nodes from the second input are dependent on the jobs coming from the first input.
Example scene using RR Dependency:
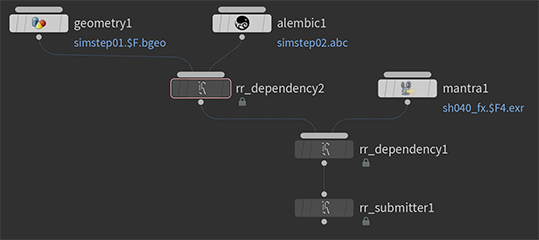
Note:
Instead of using the rrDependency nodes, you can check "Ignore ROP Inputs (auto create dependencies)" in the rrSubmitter node as well.
Then each ROP is send to the farm "without input connections". This means that the input of a ROP will not be evaluated.
Note:
As LOPs in /stage do not have any output connection, please use Fetch nodes in /out to combine your LOPs.
rrPython
Specify a python script that should be executed with Hython.
By default, RR adds these commandline flags that you can read in your python script:
-scene <SceneFile>
-FlagA <FlagA>
-FlagB <FlagB>
-FlagC <FlagC>
-frStart <SeqStart>
-frEnd <SeqEnd>
-frStep <SeqStep>
You do not have to use them in your script.
If you want to other/additional flags and values, please use Additional Commandline Param.
rrGenericJob
You can submit any Job of any render application with this node.
We have added some render apps and renderer as preset in the dropdown list.
This node can be used to render e.g. a Nuke comp or Denoise that dependends on (waits for) your Houdini ROPs.
rrDenoise
This ROP is a helper to start different denoise tools.
Of course most denoisers offer a COP to denoise in a Houdini comp.
BUT this requires a Houdini license to process.
General Settings
|
Input |
The input frame sequence to denoise |
|
Output |
The denoised files that will be written. |
|
Denoiser |
Choose a denoiser. |
Houdini
|
Layer Name |
Optional. |
|
AOVs to denoise |
The .exr layers to denoise. |
|
Include Previous Frame |
The denoiser loads the previous frame to reduce the frame to frame flickering. |
|
Options - Intel |
cleanAux: For further improving quality when the auxilary feature (albedo, normal) planes are noise-free, as described in the OIDN documentation. Default is false. |
|
Options - Optix |
Blend between the denoised image (0.0) and the original image (1.0). For example, 0.25 is like overlaying the original image with 25% opacity onto the denoised image. Default is 0.0. |
Arnold
Notes:
The required absolute minimum AOVs are the following:
- main layer to be denoised (typically RGBA also known as "beauty")
- variance layer that specifies the per pixel variance
It's recommended to set "preserve layer name" to ON in the output drivers so that the Arnold denoiser can automatically detect what each AOV corresponds to.
Optional Feature Layers
These optional layers are used to guide denoising and will greatly improve the result:
- Normal (N)
- Depth (Z)
- Albedo (denoise_albedo)
|
Neighborhood Patch Radius |
This increases the softness of the denoising (while always preserving the features). |
|
Search Radius |
This is the area over which similar neighborhoods are found. The higher the better, but it will increase the cost of denoising. |
|
Variance |
The strength of the filter is determined by the variance parameter, the higher the variance the more forceful the denoising will be. |
Renderman
Notes:
It is required that you enable the "Denoise" option in rendermanrendersettings node.
You need to also un-tick as RGBA under the Display Options
|
Mode |
The single-frame module may produce an animated sequence with severe temporal artifacts—flickering—when executed on a sequence of frames independently. |
|
Flow |
The renderman help does not state anything about what it does. ("Whether to compute optical flow"... Thanks for the info...) Pixars denoise developers state: "We either obtain motion vectors from the renderer or use optical flow". Note: These are my own assumptions! I assume that Flow is not required if you have a render motion vector AOV in your .exr. Motion Vectors are always better as Optical Flow. Motion vectors are faster to compute. Optical flow might have issues with fast moving/rotating objects, re-appearing object instances (Forest, Leaves ) or repetive textures (small checkerboard, fractals, pullover fabric, ...). |
|
Asymmetry |
A value of 0 removes all noise. |
PGD / TOP graph
Please see PDG/TOP for more information.
Distributed Simulations
Please see Distributed Sims for more information.
Solaris Gallery snapshot
You can use Royal Render to render snapshots for your Houdini Solaris Gallery.
Usage
The first time you want to use Royal Render, you have to tell Houdini that it should use Royal Render for the snapshot generation.
Click on the "Background" button and hold down the mouse button to be able to choose Royal Render.
The next time you want to use Royal Render, a single click on the "Background" button is sufficient.

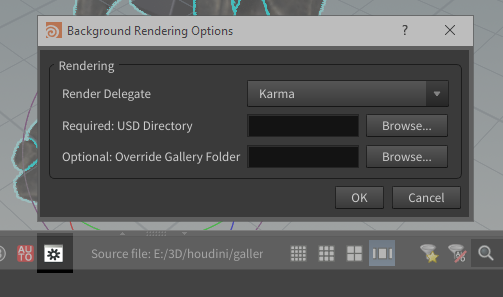
Configuration
The configuration opens the first time you use Royal Render.
Or you can open it with a click on the config button.
|
Render Delegate |
Choose the renderer you want to use |
|
Required: USD Directory |
You have to specify a (temp) folder for the .usd files on your fileserver. |
|
Optional: Override Gallery Folder |
By default, RR renders the images into the same folder as Houdini "Live Render" option. You may override the folderfor the rendered images. |
API
The Houdini to Royal Render plugin comes with a small API (htorr) to integrate the plugins functionalities into custom tools.
The interface provides a wrapper class for all supported node types.
There are two functions available:
1)
This function executes the same plugin as if you click on submit command in your Houdini Render menu.
If no rops are specified, then it parses all selected ROPs, otherwise all ROPs.
import htorr
submit(rops=[], gui=True, askForSave=True)
2)
An appropriate instance of this class can be created with a `hou` alike method `htorr.node(pathToNode)`.
The returned node wrapper instance has a attribute `jobs`, which is a custom list of all the jobs generated by this node.
To submit a job use the job lists method `submit(gui=True)`.
Example:
import htorr
rrnode = htorr.node('/out/mantra1')
print(rrnode.jobs())
rrnode.jobs().submit(gui=True)
API Documentation
The plugin is documented via Doxygen.
Natively the support for python in Doxygen is limited. Therefor doxypypy is used, which is a Doxygen filter to enable better python syntax support.
It can be installed via pip with ```pip install doxypypy```.
In order the use it in conjunction with Doxygen the file "py_filter.bat" is needed.
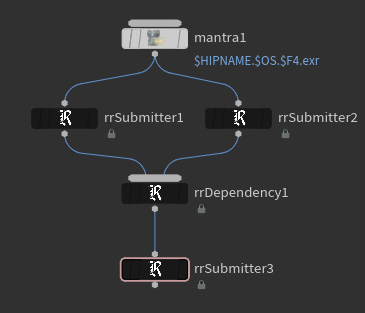
Examples
This example uses 2 rrSubmitter nodes to be able to override different options for rrJob ".ifd create" and ".ifd render".
The dependency is required to chain the 2 jobs again.
The last rrSubmitter3 node is not required. It was just added to have a Submit button.
You could use the Submit command in the Houdini menu as well.
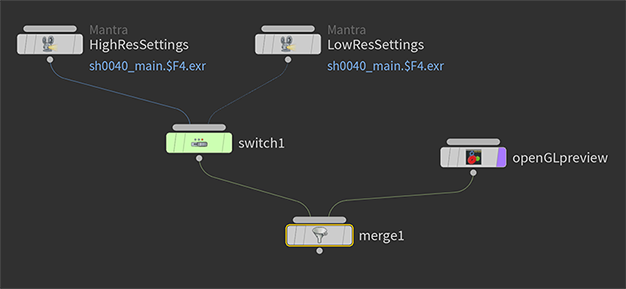
Merge and switch node parsed upstream:
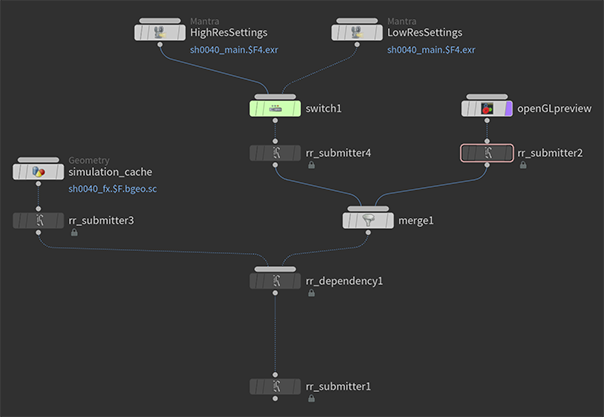
Combination of RR and Houdini nodes:
Extended combination of RR and Houdini nodes:
