KeyShot
Render Licenses
Keyshot offers different license types.
There is
|
License Name |
Console license identifier |
|
Pro |
keyshot2 |
|
Enterprise |
keyshot_enterprise |
|
Network Rendering |
keyshot_network_rendering |
By default RR uses the "Network Rendering" license.
If you change the license group in your rrClient config to "Workstation", then it uses "Enterprise".
This can be changed by editing the file RR\render_apps\_setenv\all\keyshot_inhouse.rrEnv
It is possible to specify a license folder or a FlexLM server as well by editing RR\render_apps\_setenv\all\keyshot_inhouse.rrEnv
Submission
Note: Until version 10, it was possible to load .bip files in rrSubmitter. Due to changes in the scene file format that is no longer possible.
Note: when rendering in headless mode, Keyshot 2023 fails to apply post processing filters like Denoise. To use post-processing filters on the farm, please select the keyshot executable rather than keyshot_headless in the client Render Apps config.
- First you have to run the rrWorkstationInstaller install the submission plugin.
Please make sure that Submission Plugins is enabled and after installation that KeyShot is mentioned in the log among the other render applications. The file rrSubmit_Keyshot*.py is installed in KeyShot's default resource folder, which depends on the operating system:
|
Windows |
User\Public\Documents\Keyshot\Scripts |
|
Mac |
/Library/Application Support/Keyshot/Scripts |
If a different folder is used, the script rrSubmit_Keyshot*.py must be copied there manually.
- Royal Render looks for entries from Keyshot’s render queue, so scenes must be added to the queue in one of the following ways:
- The Add to Queue button in the Options panel from the Render window.
- The Add Job button in the Queue panel from the Render window
- Render → Add to Queue in the menu bar.
- The ALT + U combination shortcut for the Render → Add to Queue action.
This queue serves only as list for Royal Render, the button Process Queue should NOT be pressed, or the scenes will be rendered locally.
- Our submission plugin is visible in Keyshot’s Scripting Console, which is found via Window → Scripting Console... in the menu bar.
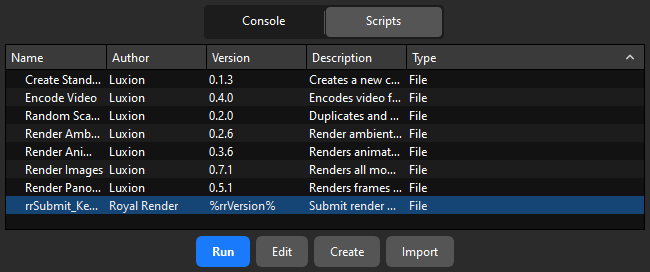
Double click on rrSubmit_Keyshot, or select rrSubmit_Keyshot and click the Run button, or Right Click → Run in the Scripting Console displays the submission dialog.
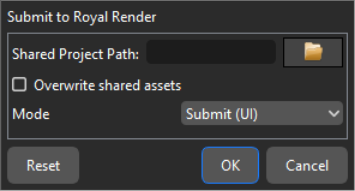
The dialog asks to select a Shared Project path where all the clients can find and render the scenes, it MUST be different from the currrent project path. The scenes added to the render queue are copied and render to this path, where the Keyshot resources structure is recreated (Scenes, Textures, Renderings etc..). Keyshot remembers this setting.
By default, clicking Ok displays the rrSubmitter window and allow to change the job settings. Clicking Submit Job(s) renders the jobs on the farm. Optional settings in the submission dialog can make the process faster.
Direct submission (no rrSubmitter UI)
Switching the Mode combo-box from Submit (UI) to Submit (No UI) sends the queued scenes directly to the render farm, without showing the rrSubmitter window.
Live submission (Watcher)
Switching the Mode combo-box to Watch and pressing Ok starts the Render Queue Watcher in a separate process. From then on, the render queue is checked periodically and scenes that are added to the render queue are sent to the render farm automatically. That allows to apply a few edits and submit again without repeating all the steps every time.
Note: Jobs added to the queue before the Watcher was launched are not sent: they must be sent to the farm beforehand.
The live submission Watcher can be stopped by launching the submission plugin from the Scripting console. The interface will be slightly different:
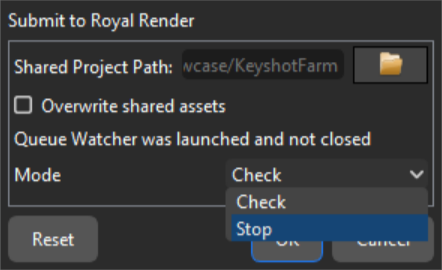
Selecting Stop and pressing OK will stop the Watcher. If the watcher was halted improperly from some reason, Using the Stop action will clean up its lock file and allow to submit jobs or launch the watcher again.
Implementation Notes
- The scenes from Keyshot’s render queue have .ext extension and an accompanying .geo file. Both are copied to the Scenes subfolder of the Shared Project Path, with a timestamp that prevents artists from overwriting each other's scene.
- It is recommended to clean-up both the local and shared Keyshot/Scenes folders periodically, as submitted scenes could grow to a large number in time.
- Textures used by the scenes are copied to the Textures subfolder of the Shared Project Path. Already existing textures are not overwritten, unless Overwrite shared assets is checked.