Blender
Submission
Install plugin
The submission plugin will be installed by running the rrWorkstationInstaller if you check the section "Workstation" and click on install.
Note if you have not installed Blender in its default location (e.g. C:\Program Files\ on Windows):
The rrWorkstationInstaller might not be able to find Blender to install the plugin file itself.
But nevertheless the rrWorkstationInstaller installs a environment variable RR_ROOT that is required for the plugin.
So you have to run it anyway.
To manually install the RR plugin into Blender, copy the file RR\render_apps\_submitplugins\rrSubmit_Blender_1+.py
into Blender/scripts/startup/
Submit
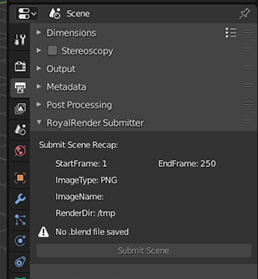
In Blender, please use the "Submit Scene" button as shown on this screenshot:
Special Variables for the filename
Blender does not support variables like <camera> or <scene> in the output filename.
But you can use the following variables instead in Blender.
The rrSubmitter converts them.
Just use these placeholders ( including brackets [ ] ) as part of the filename.
- [Layer]
- [Camera]
- [User]
- [LocalHost]
- [CompanyProject]
- [Scene]
- [SceneFolder]
- [SceneState]
- [Database]
- [DatabaseName]
Setup for rendering
You have two options to use Blender with RR
1) Local install
You need to install Blender on each client.
2) As a shared executable
You can copy all Blender versions you need into the RR folder and all Clients can use it.
1) Local Install. Blender Installation Folder
Blender 2.x:
By default the Blender 2.x installer creates the blender executable in c:\Program Files\Blender Foundation\Blender\blender.exe.
And the version of your blender installation is a subfolder named e.g. 2.78.
We highly recommend to change the installation folder that it contains the version as well:
C:\Program Files\Blender Foundation\Blender_2.78\blender.exe.
Otherwise it is not possible to use different Blender versions for different scenes/projects.
The rrClient would not be able to switch Blender to the right version.
2) Shared executable
Recommended.
Copy the file RR\render_apps\_config\additional\3D19__Blender__inhouse.inc
into the folder RR\render_apps\_config\
Please see file 3D19__Blender__inhouse.inc for further installation instructions.
Reduced Render Log
RR removes all log output that is printed while Cycles initializes the scene with its geometry and loads textures.
You may show these log messages again in your render log if you change the rrJob Setting "Verbose Level" to "Debug".
Custom Add-ons
Install Add-ons:
Copy all your custom addon folders (not the .zip package) into
RR\render_apps\renderer_prefs\blender\win_x64\<Blender Version>\scripts\addons\...
This folder is copied into the user preferences used by the rrClient.
It does not interfere with the user prefs of the artist.
If you have installed the plugins on your local machine, then you can copy them from your local machine.
On Windows please open a Windows Explorer and enter the path %AppData%\Blender Foundation\Blender.
There you will see subfolders of each <Blender Version>.
Create the corresponding version folder in RR\render_apps\renderer_prefs\blender\win_x64\
and create the subfolders \scripts\addons.
Open the local folder %AppData%\Blender Foundation\Blender\<Blender Version>\scripts\addons\
Now copy the plugin folder from the local addon folder to RRs addon folder.
Load Add-ons:
Blender does not load add-ons automatically if the scene requires them.
You have two options:
A) Load all 3rd party add-ons
There is a rrJob option "Load Add-ons".
It will loads all 3rd party Add-ons.
"3rdp party" are in this case plugins which are not located in the Blender application folder.
B) Change your scene to load add-ons
Please open the Text Editor in Blender via the tab "Scripting" while you have loaded your scene.
You have to change the scripts name from "Text" to e.g. "LoadPlugins.py" (it requires a .py extension).
The script does not require to be saved, Blender keeps this script within the Blender scene.
Add the following code lines to the script and change "MyNiceAddon" to the name of your addon.
If you do not know the internal name of the plugin, then just submit a job to RR.
The render log files of the job print some information about all plugins found.
The internal name is the one in braces ( ) .
import addon_utils
print("*** Loaded custom addon MyNiceAddon ***")
addon_utils.enable("MyNiceAddon")
#Note: you can add multiple lines for different addons
Note:
RR has already implemented this script for Redshift and LuxCore.
Redshift
Please follow the steps above "Install Addons" to install the Redshift addon.
("Load Addons" is not required, this is already implemented into RR)
Optional: Farm-wide Install
It is possible to enable a farm-wide shared Redshift folder for Royal Render.
This way you are not required to install Redshift on each machine and ensure that all clients use the same Redshift version.
And you can use different Redshift versions for different jobs.
- Edit [RR]\render_apps\_setenv\all\blender__inhouse.rrEnv with the baEnvFile_Editor (or any text editor).
Search for RR_REDSHIFT_NETWORK and set it to = 1 - Submit a render and check the render log file in rrControl.
Search for the line "RedShift source path is set to".
Create this folder.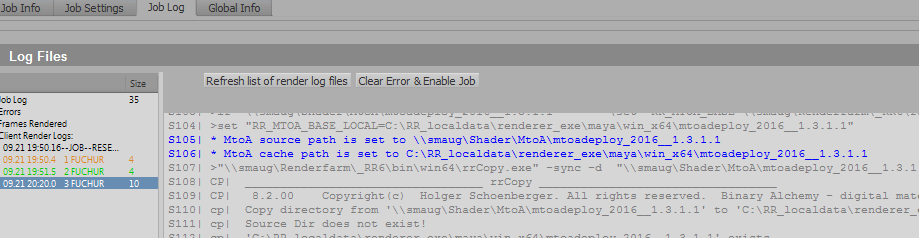
- Copy files and subfolder from your local Redshift installation C:\ProgramData\Redshift\ into that folder.
LuxCore
Please follow the steps above "Install Addons" to install the Redshift addon.
("Load Addons" is not required, this is already implemented into RR)
Cycles GPU rendering
There are three rrJob settings that control the GPU render of Cycles.
|
GPU required |
If this setting is off, then Blender uses whatever was set in the scene.
|
|
GPU_Add_CPU |
Requires option "GPU required" to be set. |
|
GPU_Use_Optix |
Requires option "GPU required" to be set. If this setting is active, then Cycles uses Optix. |